Advertisement

Subscribe For Free Updates!

We'll not spam mate! We promise.

Showing posts with label tricks. Show all posts

Tuesday, 1 April 2014

CHANGING WINDOWS’ ICONS

You can change the Icons Windows uses for folders, the Start Menu, opened and closed folder in the Explorer, and many more.

1. Open RegEdit
2. Go to
HKEY_LOCAL_MACHINE\ Software\ Microsoft\ Windows\ CurrentVersion\ Explorer\ Shell Icons
3. Add a string value for each Icon you wish to change.
Example: “3″ =”C:\Windows\Icons\MyIcon.ico,0″ This will change the closed folders in the Explorer to “MyIcon.ico”. Here is a complete list for each value.

0= Unknown file type
1= MSN file types
2= Applications Generic
3= Closed Folder
4= Open Folder
5= 5.25″ Drive
6= 3.25″ Drive
7= Removable Drive
8= Hard Drive
9= NetWork Drive
10= Network Drive Offline
11= CD-ROM Drive
12= RAM Drive
13= Entire Network 14= Network Hub
15= My Computer
16= Printer
17= Network Neighborhood
18= Network Workgroup
19= Start Menu’s Program Folders
20= Start Menu’s Documents
21= Start Menu’s Setting
22= Start Menu’s Find
23= Start Menu’s Help
24= Start Menu’s Run
25= Start Menu’s Suspend
26= Start Menu’s PC Undock
27= Start Menu’s Shutdown 28= Shared
29= Shortcut Arrow
30= (Unknown Overlay)
31= Recycle Bin Empty
32= Recycle Bin Full
33= Dial-up Network
34= DeskTop
35= Control Panel
36= Start Menu’s Programs
37= Printer Folder
38= Fonts Folder
39= Taskbar Icon
40= Audio CD
You need to reboot after making changes. You may need to delete the hidden file ShellIconCache if after rebooting the desired Icons are not displayed.

Thursday, 20 March 2014

How To Change Proxy setting In Mozilla Firefox

Step 1: First One Open Mozilla Firefox.
Step 2: Click on Firefox button at the top left side.Then Click on Options>>Options.


Step 3: Click on "Advanced" button and then click on "Settings" button under the "Network" section.


Step 4: In this window you can change the proxy settings for your computer. We recommend you unchecked all other check box other than manual proxy configratuion. check on manual proxy configration.After click on manual proxy configration in http proxy box put ip address and in port box put port number.


Step 5: After Put Ip address and prot number check the check box use this proxy for all protocols.


Step 6: Click on OK to save your changes. You may need to restart Firefox for the changes to take effect.

How To Change Proxy setting In Google chrome

Step 1: First Open Google chrome then click  on the Customize and Control Google Chrome. .


Step 2: Click on Settings in the drop down menu or Click here for go to setting.


Step 3: Select Show advanced settings.This option available at the end of chrome setting page.


Step 4: After click on show advance setting.scroll down and In the Network field, click the Change proxy settings button.


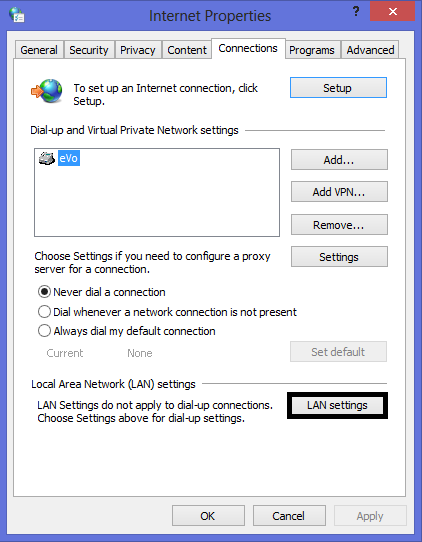
Step 5:  In the Internet Properties window click on connection tab and click the LAN settings button.


Step 6: In this window you can change the proxy settings for your computer. We recommend you unchecked Automatically detect settings , use automatic configuration script and check on use a proxy server.After click on use a proxy server in address box put ip address and in port box put port number.


Saturday, 8 March 2014

Downloading Torrent Movie Or any Type Of File Using Internet Download Manager

Downloading Torrent Movie Or any Type Of File Using Internet Download Manager

1. First download the torrent file with .torrent extension which you wish to download from the internet directly without any torrent client like utorrent.
2. Now open zbigz.com and you will land on its homepage.
3. Then Click on upload Torrent and browse your torrent to transfer and click on Go.
4. Then it will ask you for Free or Premium service, choose Free to proceed further.
5. It will take some time to cache your file. Once the caching is done, click on transfer button to download your file
6. You should have internet download manager installed on your computer so that download start inside IDM. If you don't have IDM don't worry it will download directly.

How to “Delete administrator Password” without any software

How to “Delete administrator Password” without any software

Boot up with DOS and delete the sam.exe and sam.log files from Windows\system32\config in your hard drive. Now when you boot up in NT the password on your built-in administrator account which will be blank (i.e No password). This solution works only if your hard drive is FAT kind.
Method 2

Lock Files on Windows Without Using Any Software


How many times have you wished of a software using which you can hide or lock files, restricting its access to other unwanted users. Although there are various software available in market using which you can easily lock/hide files but, i personally dont trust them because most of them are bloatware or spyware.
In this post i am going to share a simple yet powerful way of locking and hiding important files using a the following method. Follow the instructions to make you own Locker ( Without any software !! ) :

Open notepad.
Copy the following code in notepad file :

Monday, 13 January 2014

Steps to Hide any File behind JPEG image Manually

1. Create an folder into C drive (recommendation is that use this C:\Hidden).

2. Now gather all files that you want to hide in this folder.

3. Now add these all files to compressed .rar file using winrar
(example myhiddenfiles.rar ).
Note: This rar file should be in the same directory (i.e. C:\Hidden)

4. Now Select the JPEG file that you want to use to hide the above content
(say myimage.jpg). Put this image file also in the same folder that is in C:\Hidden